 Lesson learned! If someone gives you 10 days to build a truck for SEMA, just say no! Now, that being said… I did not say no. Instead, I went into panic mode and started making calls to see what parts were even available. It took 6 days to pull the parts together into two locations: here in Colorado and Las Vegas.
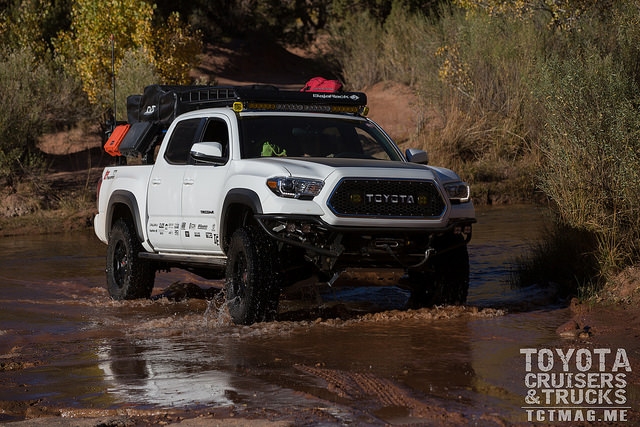
With a short three days before leaving for SEMA, the work began. At this point the only product installed was the Baja Rack Roof Rack, which was a very easy install. The pillar mounting brackets bolt into the factory mounting points, and then the rack bolts to the pillar mounting brackets.
Next, we spent 10 hours at Larry H Miller Toyota of Colorado Springs installing a full Stage 6 Icon Vehicle Dynamics Suspension: remote reservoir shocks with coilovers up front and remote reservoir with an Add-a-Leaf pack in the rear. Stopping there might be enough for most, but not for this truck. We added Icon’s Hydraulic Air Bump Stops to complete the best suspension setup I could have ever dreamed of. We wrapped up the day with the layout of the badging and Blackout to be installed later.
The next day was exceptionally long. We had a 12:00 p.m. appointment with our friends over at RCI Metalworks to get armored up with aluminum skid plates, front to rear, plus a steel differential plate. After that we headed over to InSain Fabrication for the most intense part of this build. Corey came up with the idea of a combination style front bumper so we can show off the ComeUp winch as much as possible. Corey started dismantling the OEM bumper, cutting off some of the excess plastic, and laying out the design of the new custom front bumper.
While he tore into that, I tackled painting and installing the Pure Tacoma Sliders. After finishing the sliders, we started mounting up the Baja Designs lights to the Baja Rack. Somewhere about 3:00 a.m., I fell asleep in the driver's seat while reading over the wiring instructions of my new Switch-Pros Panel Power System.
Four hours later comes my favorite wake up call: my daughter calling me to find out where I am. A little dazed, my answer was simply, "I'm not sure." Then slowly my head cleared and I realized where I was and what yet lay ahead of me for this day. “Sweetie, I'm still in Denver, we have to finish and install the front bumper so I can head to your school to pick you up.” She was getting excited, too! About then Corey came back into the shop and we got back to it. A few hours later, the bumper was finished, painted, and installed. While Corey had a couple of minutes to spare (ha ha), he put together a bed mount for my spare tire. Mind you, he did this in about 30 minutes just to make the finished truck look even more amazing! You have to admit, that man is an artist! The way the tubes work together for structural soundness. The way the plate section holds everything together in harmony. Simply, form exceeds function by far. This combined with the strength and reliability of one of the best winches on the market, the ComeUp Gen2 9.5rsi Seal Series, we should be able to get home every night, that we choose to.
After leaving Insain Fab, I made a beeline to my daughter's school to pick her up, take her home to finish packing, and hit the road. While we finished packing up the truck, Trevor from Crawlorado stopped by for a quick install of the Hood Blackout and half of the vendor logos.
As soon as he was done, my daughter and I loaded up and hit the highway toward Las Vegas. Leaving at 6:00 p.m. on a 900-mile road trip seemed like a good idea at the time, but it turned into a bit of a struggle. My daughter fell asleep about 8:15, so I couldn't crank the music or even open a window to keep myself awake. Somewhere about one hour into Utah (around 1:00 am) I had to pull off of the highway to catch two hours of sleep. I hit the road again and made it only another one-and-a-half hours before I came to the realization that I really needed a couple more hours of sleep.
Rested up and my daughter now awake with me, I punched the accelerator down and off we went. We made it to just north of St. George, Utah where we decided to take a break and grab breakfast in Hurricane with Woody and Heather from IH8MUD. After a great breakfast with great friends, we took off down the road again. Next stop: North Las Vegas for another long day and night.
When we got to town we stopped in at Discount Tire, where my 17” TRD rims and BFG KO2’s were waiting for install. The team at Discount Tire are fun to watch. All five tires and rims were mounted, balanced, and installed in just minutes.
After that, we were off to meet a couple friends for an exciting night of tacos and projects. A long night of replacing the grille, mounting a few more lights, connecting the Switch-Pros controller, and A LOT of wiring. With the help of Rod and Tina from the Vegas FJ Cruiser Club it all came together relatively smoothly.
The DB Customz Grille had to be one of the easiest modifications ever. The OEM grille just comes apart with a few screws and snaps. The DB Customz Grille slides right in place with a few new screws and then snapped back in the final ring. Talk about a great addition and personalization to the build and it really was easy to install!
The lighting for this project was a long thought out dream come true. I have been researching and testing out lighting for quite some time. Only the best would do for a build like this. I chose Baja Designs LED lights and specific items at that. For the light bar I went with the OnX6 40” Dual Control LED Light Bar with Driving/Combo pattern because of the combination of amber and white, light pattern, and the distance light is thrown. In the wings of the bumper I chose two pair of Squadron Pros, one in spot and the other in wide cornering patterns. In the grille, I chose another pair of Squadrons, this time in flood pattern, but with an amber lens cover to cut through dust or fog. Since I had a little bit of room next to the light bar, I chose a white pair of Squadron Pro in flood pattern with amber lens covers to act as my ditch lights. For night wheeling trips I picked up eight of the Rock Lights to help me see the trail under foot. To light up the camp, I went with two pairs of Squadron Sports in flood pattern to be mounted on the four corners of the bed rack. All the lighting included I am pushing over 80,000 lumen and there will not be any animals or obstacles sneaking up on me anymore.
To control all of my electrical essentials I picked up a Switch-Pros 8100 8-switch Power Panel System. This controller is really simple and straight-forward. It has eight user programmable switches, a 100 amp power module, plug and play installation, built-in automatic shutdown for over-current or low voltage, a Bluetooth interface, and comes with a sheet of legends to match up with what is wired to each specific switch. I installed the controller inside my glove box and fully intend on using the Bluetooth interface with the iPad app.
The final step of this whirlwind build was literally a last minute addition and a must for anyone wanting to get away with the family for a few days at a time. Bobby from CVT Tents, brought all the way from Bend, Oregon a Mt. Bachelor Roof Top Tent and a fully loaded bed rack from LabRak. LabRak has put a lot of research into this rack and have come up with a very cool rack system. He built in wiring conduits along the perimeter. He uses Aircraft grade aluminum with stainless steel hardware. He uses T-slots on the top, face, and bottom for secure mounting of your accessories. The entire bed rack weighs in at about 65 lbs. The Mt. Bachelor Roof Top Tent features a 2.5" foam mattress, an aluminum frame, sleeps 2+ adults, and secures quite easily to the LabRak bed rack with Yakima bars. It sits just above the top of the Baja Rack Roof Rack in a streamline pattern.
The next day started off with a mad dash to install the Cobra CB radio and Firestick antenna that we picked up from Pure Tacoma. Then it was time to park the truck on the patio in the Toyota booth. After all of the craziness, this seemed a little anti-climactic in that I parked the truck where they asked me to and I walked away. Tuesday though was a lot of fun. I spent a lot of enjoyable time giving tours and explaining all of the pieces and parts that went into this project to people from all around the world. On Friday afternoon, I took part in the SEMA Cruise. We sat in line for about three hours for what seemed like a five minute cruise and I have to say now: been there, sat in line, next time I’m good!
As with any SEMA Build Project there were a couple of glitches. Half of the logos did not show up in time for the beginning of the show and the ARB Fridge and Recovery Gear showed up Thursday afternoon.
Saturday morning we got up early, took our Tacoma Editor, Bob Holliday, to the airport and headed out to our photoshoot just outside of town where we met up with Don Grey and his Polar Tundra, Toytec and their 2016 SEMA build Tacoma, and Baja Designs with their XP1000 UTV. It was a great time as usual, though it was too windy for the quadcopter to fly.
After the dust settled and the photos were all taken, it was time to head back northeast and say farewell to another adventure, a lot of old friends, and a few new ones!
I want to give one more Thank You to the companies and some really awesome people that without their help on this project, it just would not have happened!
Thank You:
*Toyota USA for building my favorite pickup truck and putting it in your booth
*Bill and Bryce at Larry H Miller Toyota of Colorado Springs for helping piece this truck together
*Carrie and the team at BFG for developing the KO2’s
*Dan at Discount Tire Direct and the North Las Vegas branch for getting the new shoes installed
*Corey at Insane Fab for being an artist with a front bumper and spare tire mount and cramming the nearly all nighter to get them done
*The Mad Scientists at Baja Designs for making the best LEDs in the world
*Sergio and the family at Baja Rack for making an awesome roof rack
*The Staff at TRD USA for making great accessories
*Jeremy and the crew at Icon Vehicle Dynamics for making the best suspensions
*Becky and Ray at Pure Tacoma for all of your help with accessories to make this truck complete
*Danny at DB Customz for making the most amazing grille I have ever seen
*Josh and Miranda at RCI Metalworks for making some of the sweetest looking and most durable armor on the market
*Shane at LabRak for making a bed rack that exceeds every expectation
*Bobby at CVT for making my favorite tents and going out of your way to make a last minute delivery
*Trevor at Crawlorado for the kick a$$ Blackout and logos
*Matt and the staff at ARB for making one of the best fridges on the market
*Laura at Switch Pros for making a great control system
*Ben and Rod at ComeUp USA for making one of the best built winches on the market and at a great price
[flickr set=72157663140347731]
To get your copy of the
2015 Year In Review Issue:
FIND US ON:
Twitter | Facebook
Lesson learned! If someone gives you 10 days to build a truck for SEMA, just say no! Now, that being said… I did not say no. Instead, I went into panic mode and started making calls to see what parts were even available. It took 6 days to pull the parts together into two locations: here in Colorado and Las Vegas.
With a short three days before leaving for SEMA, the work began. At this point the only product installed was the Baja Rack Roof Rack, which was a very easy install. The pillar mounting brackets bolt into the factory mounting points, and then the rack bolts to the pillar mounting brackets.
Next, we spent 10 hours at Larry H Miller Toyota of Colorado Springs installing a full Stage 6 Icon Vehicle Dynamics Suspension: remote reservoir shocks with coilovers up front and remote reservoir with an Add-a-Leaf pack in the rear. Stopping there might be enough for most, but not for this truck. We added Icon’s Hydraulic Air Bump Stops to complete the best suspension setup I could have ever dreamed of. We wrapped up the day with the layout of the badging and Blackout to be installed later.
The next day was exceptionally long. We had a 12:00 p.m. appointment with our friends over at RCI Metalworks to get armored up with aluminum skid plates, front to rear, plus a steel differential plate. After that we headed over to InSain Fabrication for the most intense part of this build. Corey came up with the idea of a combination style front bumper so we can show off the ComeUp winch as much as possible. Corey started dismantling the OEM bumper, cutting off some of the excess plastic, and laying out the design of the new custom front bumper.
While he tore into that, I tackled painting and installing the Pure Tacoma Sliders. After finishing the sliders, we started mounting up the Baja Designs lights to the Baja Rack. Somewhere about 3:00 a.m., I fell asleep in the driver's seat while reading over the wiring instructions of my new Switch-Pros Panel Power System.
Four hours later comes my favorite wake up call: my daughter calling me to find out where I am. A little dazed, my answer was simply, "I'm not sure." Then slowly my head cleared and I realized where I was and what yet lay ahead of me for this day. “Sweetie, I'm still in Denver, we have to finish and install the front bumper so I can head to your school to pick you up.” She was getting excited, too! About then Corey came back into the shop and we got back to it. A few hours later, the bumper was finished, painted, and installed. While Corey had a couple of minutes to spare (ha ha), he put together a bed mount for my spare tire. Mind you, he did this in about 30 minutes just to make the finished truck look even more amazing! You have to admit, that man is an artist! The way the tubes work together for structural soundness. The way the plate section holds everything together in harmony. Simply, form exceeds function by far. This combined with the strength and reliability of one of the best winches on the market, the ComeUp Gen2 9.5rsi Seal Series, we should be able to get home every night, that we choose to.
After leaving Insain Fab, I made a beeline to my daughter's school to pick her up, take her home to finish packing, and hit the road. While we finished packing up the truck, Trevor from Crawlorado stopped by for a quick install of the Hood Blackout and half of the vendor logos.
As soon as he was done, my daughter and I loaded up and hit the highway toward Las Vegas. Leaving at 6:00 p.m. on a 900-mile road trip seemed like a good idea at the time, but it turned into a bit of a struggle. My daughter fell asleep about 8:15, so I couldn't crank the music or even open a window to keep myself awake. Somewhere about one hour into Utah (around 1:00 am) I had to pull off of the highway to catch two hours of sleep. I hit the road again and made it only another one-and-a-half hours before I came to the realization that I really needed a couple more hours of sleep.
Rested up and my daughter now awake with me, I punched the accelerator down and off we went. We made it to just north of St. George, Utah where we decided to take a break and grab breakfast in Hurricane with Woody and Heather from IH8MUD. After a great breakfast with great friends, we took off down the road again. Next stop: North Las Vegas for another long day and night.
When we got to town we stopped in at Discount Tire, where my 17” TRD rims and BFG KO2’s were waiting for install. The team at Discount Tire are fun to watch. All five tires and rims were mounted, balanced, and installed in just minutes.
After that, we were off to meet a couple friends for an exciting night of tacos and projects. A long night of replacing the grille, mounting a few more lights, connecting the Switch-Pros controller, and A LOT of wiring. With the help of Rod and Tina from the Vegas FJ Cruiser Club it all came together relatively smoothly.
The DB Customz Grille had to be one of the easiest modifications ever. The OEM grille just comes apart with a few screws and snaps. The DB Customz Grille slides right in place with a few new screws and then snapped back in the final ring. Talk about a great addition and personalization to the build and it really was easy to install!
The lighting for this project was a long thought out dream come true. I have been researching and testing out lighting for quite some time. Only the best would do for a build like this. I chose Baja Designs LED lights and specific items at that. For the light bar I went with the OnX6 40” Dual Control LED Light Bar with Driving/Combo pattern because of the combination of amber and white, light pattern, and the distance light is thrown. In the wings of the bumper I chose two pair of Squadron Pros, one in spot and the other in wide cornering patterns. In the grille, I chose another pair of Squadrons, this time in flood pattern, but with an amber lens cover to cut through dust or fog. Since I had a little bit of room next to the light bar, I chose a white pair of Squadron Pro in flood pattern with amber lens covers to act as my ditch lights. For night wheeling trips I picked up eight of the Rock Lights to help me see the trail under foot. To light up the camp, I went with two pairs of Squadron Sports in flood pattern to be mounted on the four corners of the bed rack. All the lighting included I am pushing over 80,000 lumen and there will not be any animals or obstacles sneaking up on me anymore.
To control all of my electrical essentials I picked up a Switch-Pros 8100 8-switch Power Panel System. This controller is really simple and straight-forward. It has eight user programmable switches, a 100 amp power module, plug and play installation, built-in automatic shutdown for over-current or low voltage, a Bluetooth interface, and comes with a sheet of legends to match up with what is wired to each specific switch. I installed the controller inside my glove box and fully intend on using the Bluetooth interface with the iPad app.
The final step of this whirlwind build was literally a last minute addition and a must for anyone wanting to get away with the family for a few days at a time. Bobby from CVT Tents, brought all the way from Bend, Oregon a Mt. Bachelor Roof Top Tent and a fully loaded bed rack from LabRak. LabRak has put a lot of research into this rack and have come up with a very cool rack system. He built in wiring conduits along the perimeter. He uses Aircraft grade aluminum with stainless steel hardware. He uses T-slots on the top, face, and bottom for secure mounting of your accessories. The entire bed rack weighs in at about 65 lbs. The Mt. Bachelor Roof Top Tent features a 2.5" foam mattress, an aluminum frame, sleeps 2+ adults, and secures quite easily to the LabRak bed rack with Yakima bars. It sits just above the top of the Baja Rack Roof Rack in a streamline pattern.
The next day started off with a mad dash to install the Cobra CB radio and Firestick antenna that we picked up from Pure Tacoma. Then it was time to park the truck on the patio in the Toyota booth. After all of the craziness, this seemed a little anti-climactic in that I parked the truck where they asked me to and I walked away. Tuesday though was a lot of fun. I spent a lot of enjoyable time giving tours and explaining all of the pieces and parts that went into this project to people from all around the world. On Friday afternoon, I took part in the SEMA Cruise. We sat in line for about three hours for what seemed like a five minute cruise and I have to say now: been there, sat in line, next time I’m good!
As with any SEMA Build Project there were a couple of glitches. Half of the logos did not show up in time for the beginning of the show and the ARB Fridge and Recovery Gear showed up Thursday afternoon.
Saturday morning we got up early, took our Tacoma Editor, Bob Holliday, to the airport and headed out to our photoshoot just outside of town where we met up with Don Grey and his Polar Tundra, Toytec and their 2016 SEMA build Tacoma, and Baja Designs with their XP1000 UTV. It was a great time as usual, though it was too windy for the quadcopter to fly.
After the dust settled and the photos were all taken, it was time to head back northeast and say farewell to another adventure, a lot of old friends, and a few new ones!
I want to give one more Thank You to the companies and some really awesome people that without their help on this project, it just would not have happened!
Thank You:
*Toyota USA for building my favorite pickup truck and putting it in your booth
*Bill and Bryce at Larry H Miller Toyota of Colorado Springs for helping piece this truck together
*Carrie and the team at BFG for developing the KO2’s
*Dan at Discount Tire Direct and the North Las Vegas branch for getting the new shoes installed
*Corey at Insane Fab for being an artist with a front bumper and spare tire mount and cramming the nearly all nighter to get them done
*The Mad Scientists at Baja Designs for making the best LEDs in the world
*Sergio and the family at Baja Rack for making an awesome roof rack
*The Staff at TRD USA for making great accessories
*Jeremy and the crew at Icon Vehicle Dynamics for making the best suspensions
*Becky and Ray at Pure Tacoma for all of your help with accessories to make this truck complete
*Danny at DB Customz for making the most amazing grille I have ever seen
*Josh and Miranda at RCI Metalworks for making some of the sweetest looking and most durable armor on the market
*Shane at LabRak for making a bed rack that exceeds every expectation
*Bobby at CVT for making my favorite tents and going out of your way to make a last minute delivery
*Trevor at Crawlorado for the kick a$$ Blackout and logos
*Matt and the staff at ARB for making one of the best fridges on the market
*Laura at Switch Pros for making a great control system
*Ben and Rod at ComeUp USA for making one of the best built winches on the market and at a great price
[flickr set=72157663140347731]
To get your copy of the
2015 Year In Review Issue:
FIND US ON:
Twitter | Facebook