
CUT IT! FJC Safari Snorkel Install


There’s the age old question of should or shouldn’t I get a snorkel. On a popular FJ Cruiser forum it’s ten pages deep of back and forth banter espousing the pros and cons of having one. There’s everything from power gains, waterproofing to clean air. But in the end, it’s your rig and even if it’s as simple as liking the look, then go for it. The only thing to remember is, it’s permanent. Unless of course you shell out for a new painted fender.

The install is straight forward and the directions are good, except it doesn’t tell you how to take apart your inner fender lining. This is the hardest part of the install. First, remove your intake filter box and hose (2010+ FJ Cruisers) or large hose (2007+ FJ Cruisers). I didn’t need to remove the mass flow air sensor during my install since I have an aftermarket Airaid intake filter. Depending on your situation you may need to remove more or less to access the top of your fender and the intake hole in the fender. You can access up to 3 fender clips from the top of the fender inside the engine bay. It’s easier to push them down and out from the top. Next, in the fender well, unscrew andpop-out the fender clips from the inner fender shroud as necessary to access the underside of the fender… just enough to get your hands in there to remove the existing air filter assembly (2 screws) and later to hold the nuts for bolting on the snorkel. And you thought the hardest part is cutting a giant hole into your perfectly painted fender. Another handy tool to have for the fender clip removal is a panel removal tool. Order extra fender clips online or buy them at NAPA auto parts. You’re going to be breaking a few. You can also get them on eBay or Amazon.
Now you’re ready to apply the paper template to your fender. Line up the edges of the paper with the fender edges according to the instructions, tape it on with painter’s tape and mark the holes with a Sharpie. Remove the template. Take a center punch and punch each marked hole. An automatic (spring loaded) center punch is nice to have, but a hammer and regular center punch will work also. Place painters tape over each hole before you drill. Take a drill with a step drill bit and proceed to drill out all the holesexcept the mark for the large hole. Drill and enlarge your holes up to 1/2”(16mm). Now all you need to do is drill a pilot hole for the large hole.
Take a deep breath and pump yourself up for this next step. I didn’t have a problem since my FJ isn’t new or looks new, so cutting a hole wasn’t a problem. Make sure you have a new or sharp 4 1/8” bimetal hole saw and a variable speed drill. Keep steady pressure on the fender, drill at a constant speed and be patient. Once the hole is cut, debur all the holes and apply touch up paint to protect the bare metal.
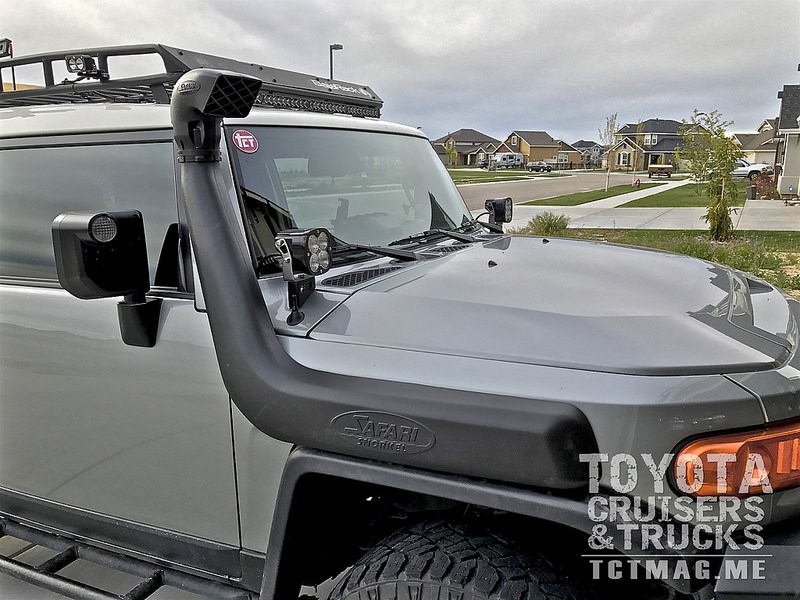
If you haven’t already have done so, go ahead and screw in all the studs into the snorkel and place the snorkel on the fender. I started at the rear of the snorkel and worked my way to the front, tightening each nut and washer onto the stud. All the while keeping an eye on the alignment of the snorkel to the fender and making any adjustments. I had originally wanted to place some dum dum strip caulk on the backside of the snorkel to seal it to the fender, but after messing with it I decided to forgo the sealant and just install it as per the instructions. The photo shows the dum dum in place before I removed it.
Attach the snorkel’s neck to the passenger side A pillar with the included bracket. Place tape on the A pillar where you’ll be drilling. Bolt the bracket to the snorkel’s neck and use it as a template to mark the holes for the three holes that need to be drilled into the A pillar. Now remove the bracket, drill out the three holes on the A pillar, remove the tape, push the included inserts into each of the three holes, reattach the bracket to the snorkel’s neck and tighten it all up. As a precaution you can also put some silicon sealant on each screw to prevent any rusting on the A pillar. Attach the snorkel head using the pipe clamp. Attach the snorkel’s neck to the passenger side A pillar with the included bracket. Place tape on the A pillar where you’ll be drilling. Bolt the bracket to the snorkel’s neck and use it as a template to mark the holes for the three holes that need to be drilled into the A pillar. Now remove the bracket, drill out the three holes on the A pillar, remove the tape, push the included inserts into each of the three holes, reattach the bracket to the snorkel’s neck and tighten it all up. As a precaution you can also put some silicon sealant on each screw to prevent any rusting on the A pillar. Attach the snorkel head using the pipe clamp.
The final step is to attach your snorkel to your air intake through the hole in the fender. This will differ for some depending on your model FJ and/or aftermarket intake brand. Using the included large diameter rubber hose I attached my snorkel to the Airaid intake and used the pipe clamps to make a permanent, air tight connection. Snorkel install complete. oh but there is one more thing. Frank Conseco at YodaTEQ.com makes stainless steel and powder coated snorkel grills to replace the molded plastic grill. I installed one of his black powder coated Toyota TEQ snorkel grills. You have to remove the existing plastic grill with a Dremel and drill new holes for the grill, but it looks really nice once it’s done. Now go and enjoy that well deserved cold beverage.
[flickr set=72157684024108274]
To get your copy of theSpring 2017 Issue:   FIND US ON: |

