
Switch-Pros All-in-One Switching System


If you know me, you know I’m a nut when it comes to wiring up lights on my FJ. I started out with an sPod switch system to control all the lights, but at Overland Expo in 2015 I discovered Switch-Pros and their new 8100 Switching System.
A quick demo at the Pelfrey Built booth had me hook, line, and sinker. The funny thing was that sPod’s booth was just across the road and they were showing off their newest touch screen module, but I wasn’t interested in something built on the older relay/fuse system. I just saw the future in a solid state, modern switch system by Switch Pros. The brain was small andcould be mounted virtually anywhere. There was only a small wire harness containing 4 small gauge wires to route into the cab of the vehicle and the switch module was small for easy mounting. It had 8 switches, 2 more than the sPod, and could be customized with the included sheet of switch decals. Whenever I see innovation in our market it gets me giddy. Here was a new company flipping switching control systems on it’s head. There are plenty of offerings from basic do-it- yourself relays and fuse boxes to the sPod, but there is a new kid on the block with something up its sleeve.

Mounting
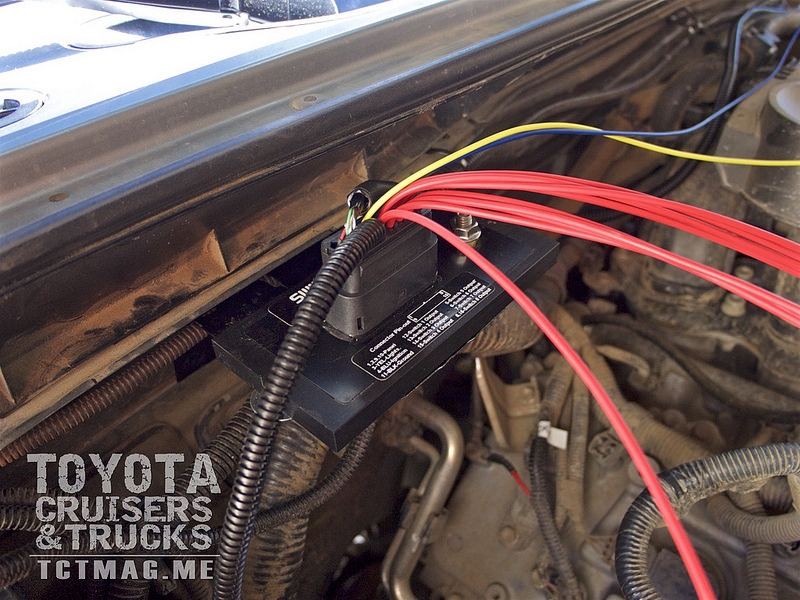
In a few of the installs I’ve seen, the control module was mounted near the battery. The control module contains the brain, has a positive post and waterproof harness connection. I decided to install a bracket on the rear firewall of the FJ where my sPod was previously installed. I found an L style bracket in the lumber section of Lowes where all the angles, clips and straps are for tying lumber together. It provided enough surface to mount the switch module and the Blue Sea terminal bus.
Making the Connections
I connected all my exiting ground wires from my accessories to the new Blue Sea terminal buss. Using the diagram in the instructions I noted which wires on the switch module corresponded to each switch on the switch module. I wanted all my roof lights on the top row and the bumper lights on the lower row. I labeled each wire with a label maker and did the same to each wire for each accessory. This bit of work helps keep things organized when making the final butt connections. I made all the connections. I tidied up the wires by bundling them with several zip ties to keep it neat. There was an “ aha” moment after finishing up my install; I may re-do the positive connections with a small bus bar so that the connections are not permanent. The buss bar allows for all connections to be made at a screw terminal so further wire organization is possible on the positive side. So, having two matching terminal bus bars, one for ground and one for positive is the way to go. This is one thing the sPod does well because it provides screw terminals for ground and positive.
Routing the Switch Harness
I used the same hole I used for my sPod in the main firewall boot to pushthrough the significantly smaller 8100 switch panel harness. I sold my sPod and included the driver’s vent with the six installed switches. In return, the buyer gave me his untouched driver’s vent, so in return and I had a new,clean surface to mount my 8100 switch panel. I drilled a hole large enough to route the harness through the vent and it provided a clean install with no exposed wiring. I used 3M VHB double sided tape to mount the switch panel. Using a band saw, I cut off the mounting tabs on the sides then I sanded and wrapped the entire sides of the panel with black decal vinyl for a clean look. I used a razor blade to make a clean cut around the edge using the panel’s edges as a guide for the blade. You can’t tell I cut them off. Switch Pros will be providing forthcoming versions with no mounting tabs for more installation choices. Had I left the mounting tabs on the sides of the panel it would have been wider than the vent’s width and looked goofy.
Connecting Your Accessories
Installation is easy, even for the electrical novice. That’s why I recommend an all-in-one solution like the sPod or Switch Pros to many friends starting out. This gives you the ability to organize your wire routing to keep it clean and plan for future accessories. Mine was a bit more difficult because I had all my accessories hooked up to the sPod. Consequently, I needed to remove and reorganize the wiring to connect it to the newSwitch Pro 8100. It was tedious and I’m satisfied with the results, but since I like clean installs I’m already contemplating re-doing the layout for an even cleaner install. The 8100 is a nice unit but the sPod was better at organizing the incoming wiring since it had negative and positive terminals for connecting your accessories. The 8100 only has positive connections and it’s up to you to figure out where you’re going to terminate your ground wires. I installed my 8100 with a Blue Sea Terminal Buss for all my negative wire connections and connected all the positive wires on the 8100 to each accessory positive using the included heat shrink butt connectors.
Programming the Switch-Pro
There are two different methods to programming each accessory on yournew Switch-Pro. Either at the switch panel or on your smart phone. The Switch-Pro comes with Bluetooth installed. I tried both methods and the smart phone method was easier since you have direct feedback when inputting settings for each accessory. When you’re programming via the switch panel buttons you have to pay attention and count the blinking lights to keep track of where you are in the setup. You can configure several features on the Switch-Pro; momentary, battery input, flash, strobe, override low voltage disconnect, memory, switch panel dimming, switch names, set password and master switch.
Momentary: Set your switch to act like a momentary switch.
Battery Input: Set your switch to remain on with the ignition turned off. The default is all switches are “ hot” with ignition turned on.
Flash: Set your switch to a secondary flash when the switch is double-tapped.
Strobe: Set your switch to strobe (flash fast) when double-tapped. You can’t have both flashing and strobing lights. It’s one or the other.
Low Voltage Disconnect: The unit will shut down if it detects 11.5 volts for 60 seconds. If it detects 12 volts for 60 seconds it will can be powered onagain.
Memory: Set the switch to come on with the ignition.
Dimming: Set the switch panel night-time backlighting and LED indicatorbrightness.
Switch Names: Set the name of each switch.
Set Password: Set a password to secure the system.
Master Switch: When programming via Bluetooth you can set a master switch to activate more than one accessory. For example, set a switch to turn on all your roof lights.
When using your smart phone to control the Switch Pro, you can turn on and off accessories using Bluetooth regardless if you had programmed the switch to function with Battery or Ignition Input set to ON.
It’s good to know companies like Off-Road Engineering keep pushing the envelope and advancing the technology to power all of our accessories in a safe and well-thought-out package. Like I said earlier, I wouldn’t hesitate to recommend the Switch-Pro to anyone looking for an all-in-one switching system.
[flickr set=72157670834725290]
To get your copy of theSpring 2016 Issue:   FIND US ON: |
