 In the previous issue I went through how I began my 4 door Tacoma Build. This time I want to cover how I solved storage, electrical, and communication issues.
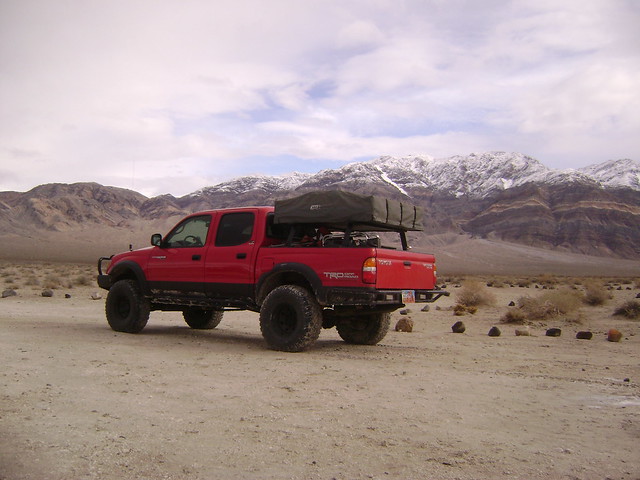
Notes: With a cab loaded with passengers (or a 100 lb dog) and the short bed of a double cab, space instantly becomes a premium on a longer trip. Add tools, recovery gear, camping gear, fuel, water, and some firewood and the DC's short bed quickly becomes stuffed. The RTT mounted above the bed helps in several manners. Not only does it eliminate a tent packed in the bed, it allows for a place to store a couple of sleeping bags and camp pillows, as well as acting as a partial cover over the bed, keeping some degree of the elements off the gear in your truck bed.
I won't go into too much detail about the ARB Simpson III tent, but if you’re interested in knowing more about tents and their pros and cons in general see my previous article: Is a Roof Top Tent for me? The RTT Conundrum (add link addy if print, otherwise hyperlink)
As time has progressed, my trips have gotten longer and I find myself transporting more people and their gear, more often than before. The Windcheetah rack was an effort to find 'more room' for lightweight yet bulky gear: things like camp chairs, clothing bags, etc. The rack is new to me and I have not yet really figured out how much I will use it. With the mounting system I was able to design for it, it comes on and off in just a matter of minutes. Its extruded aluminum design (same as that of the Bakkie Rack) means it is not only strong, but extremely lightweight, so maneuvering it on and off the truck (as well as storing it in the garage) can be easily handled by a single person. If this were a traditional rack that took extended time to install, had a more permanent mounting system, or was heavy and bulky to store, I don't think I would be experimenting with it.
I recently added the Core-Trax tie-down system down both sides of the bed. This allows for infinite mounting configurations and thus easier loading, unloading and reloading. Each mounting ring is rated for 500lbs, giving me plenty of trust that my fridge isn't going to bounce out of the back of the truck as I scoot down a wash-boarded road.
The ARB Touring Awning is one of my most commonly used additions. It is setup to allow mounting to the Windcheetah rack from either side. When the tent is deployed it’s opened out towards the driver’s side, so the predominant mounting of the awning will be from same side. This gives some nice shade under the awning as well as the portion of the tent. I've really been enjoying the shade and rain protection it provides. With the Bakkie rack tent setup, the deployed tent sits just under my walking height, so while it’s great for a camp chair or two and keeping gear dry, it’s not a comfortable place to stand, cook, etc. out of the sun or rain. With the awning I've got some decent coverage that is at full height that I can walk in an out without problems. Like the rack, I wanted the awning to be removable in a matter of minutes, and in this case with the mounts used it comes off in a matter of seconds and is easy stored out of the way in the garage or bed of the truck.
Electrical/Lighting:
Basic Specifications:
- Odyssey dual batteries
- National Luna Dual Battery system
- IPF 800MSR Front Lights
- Edge Insight CTS Diagnostic and Scan Computer
- gamviti switch bezels
- Panavise dash mount (IPod or GPS)
- OEM fog switches
Notes: Installing dual batteries into the 1st gen Tacoma is a bit of a chore compared to the wide-open engine bays of Land Cruisers that I am accustomed to. I had installed a couple of setups in customer Tacomas in the past; in those cases I used a battery tray mounted on the passenger side and the stock battery size in the stock location on the front drivers side. I wanted to conserve space under the hood for future additions as best as possible, and I wanted to use some of the Odyssey metal jacket batteries-- which are only available in a smaller case size. A perfect fit. The smaller batteries allow for a dual battery mount in the stock location using a custom battery tray and clamping system. To control the batteries I utilized a National Luna Intelligent Solenoid, another product I had been familiar with from customer installs and was excited to use on my own vehicle. It’s been a fabulous addition to date, with in-cab controls and monitor, and a truly 'idiot proof' charging system that does all the work for you.
The Edge Insight CTS gauge display and monitoring system is one of my latest additions. While it’s most useful when you have a check engine light displayed, it’s also very functional in detailing the running conditions and parameters of your vehicle-- including coolant temp, miles-per-gallon, engine load, intake temp, corrected speed, and much, much more. It simply connects to the OBDII port, meaning if you want to take it in and out for aesthetic or security reasons it’s just seconds to install or remove. I chose a more permanent mount for my install, routing the cable behind the dash trim and mounting the provided suction cup mount to the lower left hand corner of my windshield. It doesn't block any visibility and is easily monitored by the driver without distracting much attention from the road. The software behind the CTS is continually being updated by their engineers and is easily downloaded by plugging the head unit into a computer. With their last revision I now have a maintenance manager that keeps tracks of things like oil changes, tune-up needs and the last time I put in an air filter. Very handy to have one less thing to worry about forgetting. Future additions to the CTS will allow the user to add their own sensors, which in turn will feed digital gauges on the CTS. This means I can have the single CTS unit monitor my supercharger boost or trans temp, two things Toyota never included in their diagnostic parameters. At one point I had planned to add a gauge pillar for these same two variables, and thankfully I put it off as the CTS is a far cleaner implementation and allows me to set audible alarms if/when I have any out-of-bounds gauge readings.
Communication/Audio:
Basic Specifications:
- Yaesu 2M Ham Transceiver
- Cobra CB Transceiver
- Alpine DVD system w/ XM Satellite Radio
- Byonics Micro-Track Vehicle Tracking System
Notes:
Choosing electronics can be a major headache. I don't deal with them on a daily basis like other vehicle accessories, so when it came time to choose my components I made a few calls to those that do-- Ratio Electronics and Communication Products. Between the two I made a game plan for a dialed-in system that handled not only my current needs but future needs as well. The Yaesu ham radio units are time-tested and reliable radios, simple as that. I wanted a small unit-- the Yaesu FT-1500M fit the bill and was in fact small enough that I was able to mount it in the location of the stock ashtray, out of the way and visible to both the driver and passenger. My mounting took several hours with the dash torn apart and I no longer have an ash tray, but the simple and clean install was well worth the cons, and I have a console with plenty of room for the inevitable junk that would have ended up in the ashtray. To keep up with the clean and un-cluttered approach to electronic mods, I went with the Cobra 75WXST CB radio. I used one in my previous Tacoma and I like the way it mounted, for the most part, behind the dash. When not in use the mic can be stashed in the console or glovebox, leaving just a single connector visible. The Alpine DVD/Stereo system came about due to the fact that my factory head unit failed. When removing it from the dash, dust was literally dumped out of every hole in the thing which I'm sure lead to its demise. I must admit it’s been nice to watch a movie while waiting out a rainstorm in the mountains or for my wife in the mall. I've since added satellite radio and an IPOD interface to the setup, allowing me to have music in the middle of nowhere or listen to my favorites off the IPOD, all controlled by the head unit.
The APRS tracking system is the latest electrical addition to the truck. By utilizing the 2M ham radio repeater system, the APRS (Automatic Packet Reporting System) sends out a digitized GPS coordinate and time stamp to a 2M ham repeater every few minutes. That repeater in turn basically re-broadcasts that coordinate and time to digital systems, allowing the real-time location of the truck to be viewed by anyone with internet access. For example, I can be in the middle of the Nevada desert, out of cell phone range, but my wife back home can see exactly where I am and (good or bad) can even see how fast I am driving. Other uses include allowing late parties to catch up to our group, or see where we camped that evening, and it allows me to view my track when I'm back in front of a computer. The system can be disabled at will, and for those wanting more from the APRS system it can even send outgoing status messages or other data. You can read more about the APRS system on wiki here: http://en.wikipedia.org/wiki/Automat...porting_System
In the next issue I’ll complete this build retrospective by covering performance, parts, and repairs with my Taco. Make sure you check it out in the September 2013 issue of Tacoma Magazine!
Kurt Williams has been a Land Cruiser owner since he was 15 and a Tacoma enthusiast for over 10 years. His strong love of 4x4s combined with business management skills has made Cruiser Outfitters a strong competitor in the four wheel drive retail industry.
Related Articles
Photos!
[flickr set=72157634749541204]


Remember, tell your friends! They can subscribe for FREE using this link!
Find Us On: 

{fcomment}