Overall the installation process of the Prinsu AccessRac is very straight forward. The most difficult part of the installation is modifying your access cab roof placing the inserts within the roof track that will allow you to mount a roof rack on your access cab Tacoma. A downfall with Toyota’s access cab is the lack of mounting holes for a roof rack as the double cabs have. So in order to install a roof rack on an access cab, mounting holes will need to be created in your roof to accept a roof rack. This step is the most time consuming part of this install and requires great care as you really don’t want your roof to randomly start leaking on you. With care and ample sealant, this task can be completed with confidence in your roof.
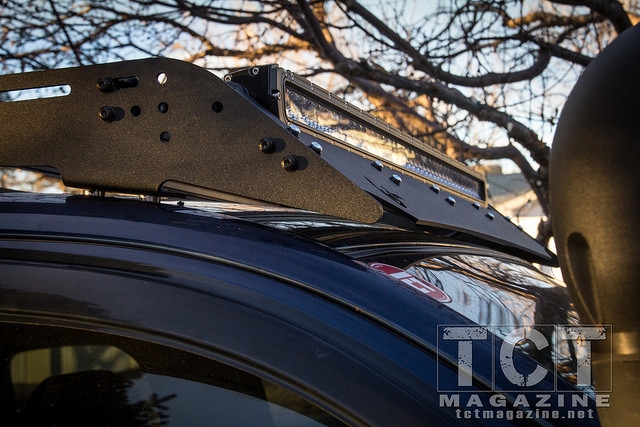
We chose to install a 40” Heretic light bar with our Accessrac. Prinsu offers a precut wind deflector allowing you to run a recessed light bar on the roof. So our first task was to mock up the light bar while the rack was off the truck. Prinsu provides slot nuts to run in the rails of the cross bar which is used to attach the deflector to the Accessrac.
With the light bar centered on one of the crossbars, mark your mounting holes to attach the light bar.
Use a hole punch or similar to make the drilling process easier, then drill out your two light bar mounting holes and attach the light bar. With the deflector in place (we suggest installing one or more crossbars to keep the Accessrac rigid during mock up), loosely attach the light bar cross bar. In our install, we kept the deflector as low as we could which reduced the space above the roof and also kept the light bar low relative to the rest of the rack.
You will need to drill one hole on each side for the light bar mount when you decided on a location.
It is important to run through all steps of the installation prior to digging in too deep. Lay out all your parts, make sure you have all the hardware and tools needed to complete the task at hand.
With a handful of cross bars installed, take the roof rack and place it carefully on the roof for mock up.
This took me a little bit to find a location that appealed to me. Where I sit now, I have a 1 ¾” overhang from the roof edge, which puts the front hole center approximately 7 3/8” from the roof edge.
To make the install look more “factory” and help in the waterproofing, I decided to modify the rubber molding on the roof. With the rack mocked up where desired, I marked the edges of the rack mounts. Then using a Dremel, I cut out six sections of the molding where I gained access to the roof to drill for the inserts.
I took each of the sections I cut out and cut out areas that the spacer and mounting bolts could sit, allowing a water tight seal around the rack mounting locations. Take note that there is a metal strip running along the bottom of the rubber molding that you will be cutting through during these steps. After completing this install, another method came into thought to simplify this process. You can keep the molding intact and mark where the holes will be drilled. This way you can only cut out the sections for the spacer and bolt to go through, leaving the molding in one long piece.
With your favorite RTV sealant, apply an ample amount on the recently drilled hole before inserting the rivnut. Then using the supplied tool, tighten down, securing the rivnut in place.
Each rivnut is designed to clamp down on the sheet metal as you tighten down with the tool. This gives you a threaded insert securely attached to your roof allowing you to now fasten the roof rack down.
With the rear most hole set, I did a final mockup of the rack and marked the remaining eleven holes to be drilled.
When all holes are drill and rivnuts inserted, it’s time to lay down the molding and place your spacers. For the molding, I used black silicone as the sealant/adhesive, laying a bead on both sides and along the middle. Additional sealant was used around the edge of the spacers completing the seal.
And finally on to the final installation! Lay the assembled rack on the spacers and loosely tighten the mounting bolts allowing enough room for final adjustments.
When you’re happy with the alignment, tighten down all the mounting bolts (tight but not too tight), tighten down your light bar mounts as well as each cross bar and finish wiring your light bar.
Since we’ve had the Accessrac on the Tacoma, we’ve since added a pair of watertight storage cases as well as moved our MaxTrax to the rack for easier access. I’ve stood on the rack numerous times with no worries and I constantly am using the rack to pull myself up to access the storage. Besides additional storage, Maxtrax mounting and giving a 40” a home, the rack has helped deflect wind over my CVT Mt. Rainier that I have mounted over the bed. As with most roof racks, the only downfall has been the occasional wind noise if the wind hits the holes just right on the sides.
In addition to the Accessrac, Prinsu also offers the Cabrac for the Double Cab Tacoma, the Toprac for those with a topper, and the Roofrac for an FJ Cruiser or an 80-series Land Cruiser.
Visit Prinsu Design Studios on Facebook (https://www.facebook.com/prinsudesignstudio), Instagram (https://instagram.com/prinsuds/) and see their full lineup online http://www.prinsudesignstudio.com
[flickr set=72157656346643129]
To get your copy of the
July 2015 issue:
![]()


FIND US ON: