 Since we started FJC Magazine, we’ve done a total of 10 articles for Off Road 101. These tips, tricks, and information have covered the gamut from tire options to trail armor, we’ve covered nearly everything a new FJ Cruiser owner would need to know.
After owning our FJ for nearly 4 years we decided to get this simple mod done. I say simple because while this method of mounting your accessories isn’t the sexiest, it’s one of the least expensive. It literally only takes 20 minutes to finish once you have the supplies, and it works really well. If you have one of the other solutions and you’re happy with it, that’s great! If not, follow along as we build the 20 minute mounts.
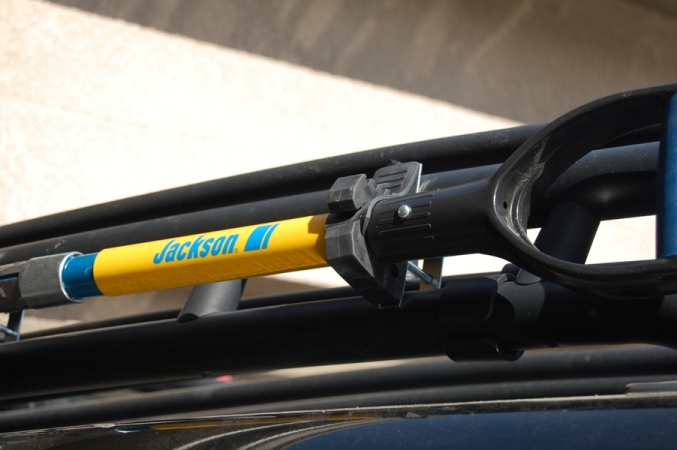
The first thing you need are supplies. We’ve seen Quick Fists used for shovel & axe mounts in dozens of different ways, but no matter how it’s done the Quick Fist is one of the best mounts to use. They hold the item tight and are easy to remove when needed. What’s more, you don’t have to worry about the weather affecting them so it’s really a no brainer. We ordered our original size Quick Fist Clamps (QF1) from Sierra Expeditions. At $9.95 for two they have one of the best prices around. They were delivered quickly and without hassle.
The other parts you need for this project can all be found at Lowes for under $20. That list includes:
• 4” X 5/8” Mending braces (or other suitable mounting plate) – 8 total
• M6-1.00 X 65mm bolts – 4 total
• M6-1.00 hex nuts – 1 package
For the install ALL you need is two wrenches and/or sockets that fit the bolts & nuts you purchased.
Our total cost for this project was about $44. That’s $22 each plus 10 minutes of labor for two highly functional accessory mounts.
Ok, for the install there are 5 easy steps:
1. Assemble 1 Quick Fist, 2 plates, the bolt nut as shown in picture #1
2. Slide the assembly between two of the rack tubes (on the stock rack)
3. Tighten the assembly down. We tightened it enough to bend the plates in just a little, but don’t over tighten.
4. Repeat steps 1-3 with the second mount
5. Install your accessory.
That entire process should take less than 20 minutes and you’re all set. The only thing we may add in the future is painting the hardware black to match the roof, but we want to make sure this holds up OK before we worry about that.
So far the mounts are holding up very well. We’ve had them on a couple of runs and the items haven’t moved or shifted at all. The Quick Fists hold things together nicely so we don’t expect any problems. If you do this mount, or have another great quick, easy, and inexpensive mount to show off please e-mail us at
{gallery}/issues/2010/july/20minmounts/{/gallery}

NOTE: Internet Explorer users should right click and select "Save Target As"