
80 Series Horn Replacement
Your 80 series Land Cruiser is old. 17-21 years. 200,000 to 300,000 miles (or more). While it may not yet be a classic like an FJ40 or FJ55, it also has many more systems. It’s amazing how long these systems last, but parts do wear out.
In addition to bearings, inner axles, and spindles, I’ve replaced door gaskets, suspension bushings, door switches, and the fuel door spring. I have adjusted the hood bumpers, replaced hood and liftgate struts, and even an entire liftgate that was starting to rust. These repairs keep your rig in tiptop shape and eliminate the kind of neglect that leads you to neglect even larger problems.
Recently I tackled a problem with multiple systems impacts. This may not be as big an issue for you. You may live in a place where people forget their Cruiser even has this feature. No, it’s not the locker. It’s the horn.
Like most people, I have a past. I live in Denver now. Denver is a fairly easy place to drive and people are generally polite drivers. But I grew up in Queens, New York. The city. The Big Apple. Proper use of the horn was a required part of driver’s ed.
The horn stopped working in the most unlikely place. In the middle of the 10th annual Outlaws Run, in remote northern New Mexico. I must have had a good reason to sound the horn in a place so remote. I pressed, and nothing happened.
Upon returning to Denver I searched ih8mud.com and found the fault was most likely a worn contact in the steering column. Mounted to the fixed part of the column is a part called a “horn plate” (PN 84312-12040, list price $9.25 from Dan “CDan” Bussey, parts manager at American Toyota in Albuquerque New Mexico). Every time the steering wheel moves, it rubs the horn plate against a contact ring. Amazing it lasted so long. However, it turns out that failure has nothing to do with use.
By the looks of it, it’s a pin and not at all a plate. But Toyota calls it a Horn Plate. At under $10 it was an easy choice to buy one. Another option would be to replace the entire steering column switch assembly (known as the Combination Switch) at a cost closer to $200.00. For that you would get all new steering stalks (turn, headlights, cruise, etc.) I opted for just the pin, figuring that if I needed more, I’d only be out $15.00 and some time. It was the right call for me.
The first step in the job is removing the center cover to the steering wheel, known as the “wheel pad”. I have a 1993 Land Cruiser which does not have airbags. If you have airbags, determine the proper procedure for your vehicle. The wheel pad is held in place by one screw located on the back at approximately 6 o’clock. I then used needle nose pliers to gently push the clips that are found at ten and two. This frees the wheel pad, but don’t remove it all the way yet. Lift the wheel pad until you can see and remove the horn contact wire. It is a quarter inch spade connector. Mine slid right off.
Removal of the wheel pad reveals a 19mm nut holding the steering wheel to the steering shaft. Loosen the nut but do not remove it all the way. Note, and perhaps mark, the position of the steering wheel as you want to reinstall it in the same position. (My steering wheel was turned slightly and this allowed me to reinstall it straight.) By holding the steering wheel at three and 9 o’clock and gently rocking back and forth, it should release. If not, you need a steering wheel puller.
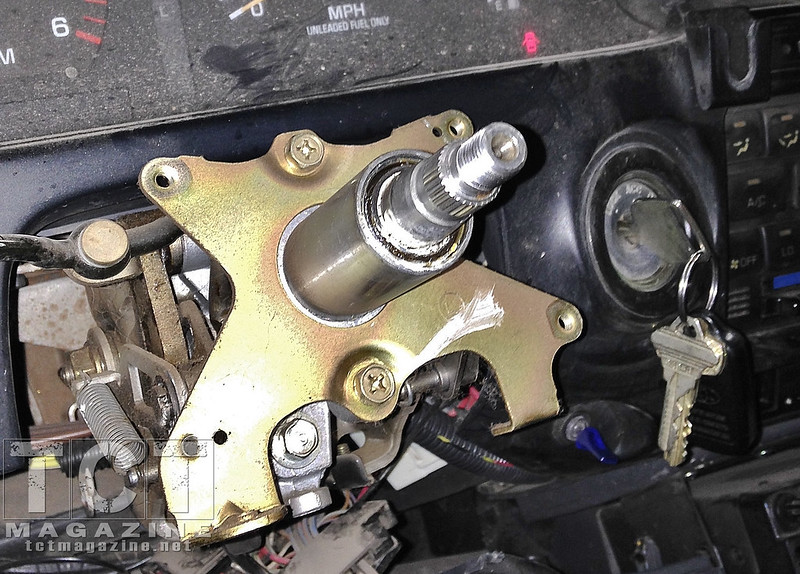
When you remove the steering wheel you will see the “horn plate” (pin) at approximately 11 o’clock.
Next remove the steering column cover “clamshell” that surrounds the switch mechanism. There are two screws that hold the lower half of the clamshell to the upper half and three screws that hold the lower half of the clamshell to the steering switch assembly. All are found on the underside of the clamshell and all need to be removed. Once the screws are removed you may need to adjust the tilt steering to make removal of the top half easier. The lower section may take a little manipulating around the cruise control stalk.
Next remove four screws that hold the Combination Switch assembly to a backing plate. At this stage if you are just replacing the horn plate you may be able to slide the switch assembly forward enough that you can get behind it and remove the wire and replace the pin. Some models have a circlip holding the pin from coming too far forward and you need to access this circlip from the backside of the switch. My 93 either didn’t have or never had the circlip. There was just a wire clip to the end of the pin which kept the pin from coming out too far. However I loosened up the wiring harness underneath the steering column so that I could slide the switch assembly completely off of the shaft for easier cleaning and inspection. This made it very easy to see that there was no circlip, remove the wire, and install the new pin, which I did not do until after I completed cleaning.
My old pin was worn about ¼ inch shorter than the new one.
The switch assembly was filthy. But I was more impressed in what good shape it was in. After wiping away old grease and dirt using a combination of rags and Q-tips, a visual inspection showed the detent ball that cancels the turn signal had worn a groove in its travel path. The contact ring on the back of the steering wheel on which the steering plate rides (if anything this part should be called a steering plate) did not show any signs of wear. Cleaned and greased, the Combination Switch should continue to function a very long time.
Next I pulled off the center plastic ring/collar which contains the turn signal cancelling mechanism. Note the position of this ring before removal. The ring has three protruding nubs (12, 5 and 7 o’clock) that fit into corresponding spots in the back of the steering wheel. I decided to remove this ring as it was heavily contaminated with brass specks from the steering plate. It was also rough when rotated. To remove the center ring use a screwdriver to gently pry the turn signal canceling bar out of the way (rotate the ring and you’ll see the bar move) and pull the center ring towards you. There is a spring behind the center ring but it stays put when you pull the ring off. I thoroughly cleaned the ring and the spring with soap and water and used a Q-tip to remove as much dirty grease as possible from inside the switch.
Reassembly is the reverse of disassembly. Grease all the contact parts. I greased the places the ring was rubbing. Now it’s smooth. A long thin grease nozzle that came with some bicycle parts years ago was handy for squirting a grease into all the small areas. Not necessary, but I removed the headlight switch arm which contains the high-beam switch. If you remove the headlight switch arm, do not lose the small detent ball at the end of the shaft.
Before I put the steering wheel back on, I lightly coated the horn contact ring with di-electric grease and put di-electric grease in the hollowed recess on the tip of the new pin, and a dab at the end.
All that remains is to reattach the steering wheel. Check that the nubs on the turn signal canceling ring are in the proper position to align with the steering wheel. Once you have put the steering wheel back on the shaft I recommend you install the nut finger tight and then cycle the steering wheel and turn signals in both directions to make sure the canceling feature is working properly. Torque the nut holding the steering wheel to the column as specified in the factory service manual.
As a bonus, the steering is now silky smooth, free of that formerly present light scraping feel.
Now go honk. That’s the only way to know it’s working.
More Photos:
[flickr set=72157650462635018]
To get your copy of the
January 2015 issue:


FIND US ON: