
iPad Install in FJ Cruiser
 If you’ve been a reader of FJC Magazine for a while, you know that we’ve always strived for the best options when it comes to navigation, especially off road navigation (See Off Road Navigation Parts 1-3, April-October 2008). In our January 2009 issue we covered the Kenwood 7120 with custom topo maps loaded with about 300 of our favorite Colorado off road trails. At the time that was absolutely the best available option for in-dash navigation with topo/off road maps.
When the iPad was announced last year it was pretty clear that this device could change everything. The iPhone is a great device and can be used for off road navigation to a limited degree, but the small screen really makes it better for hiking vs off road driving. This fall the ideal solution became clear when we realized that we weren’t using many of the features the Kenwood had to offer. In reality it had become little more than a pass through for our iPhone. We did use the topo maps when offroad, but the outdated (2008) maps for everyday use started becoming an issue. The Kenwood is still a great system for those that aren’t interested in the modifications required when installing an iPad, but for us it was time to move on.
Last year, just after the iPad shipped, Scosche demonstrated their iKit, which is meant to integrate the iPad into any double-DIN dash, but that product hasn’t been released yet so we had to figure out our own parts. So we built a list of parts we knew we would need to install an iPad in the FJ. The initial intention was to find a small amplifier that would fit in the dash, which would make the install very tidy and easy to do. Unfortunately, after trying several options we could not find a suitable amp so we ended up installing the Sony Xplode amp under the passenger seat. This solution works well but does add at least an hour to the install time. Not counting the time it took for the install, the entire project ended up costing about $1,050 including all the installation hardware. This is in the same range as low-end NAV systems and about half the price of some of the new Kenwood systems that support custom maps.
 The last piece we had to figure out before the install was what software we were going to use. We basically have two things in mind for the in-dash iPad install. First, we need a competent turn-by-turn navigation software. There are several options for the iPad but we decided to test the top two: CoPilot HD from AKA and Navigon. The second software package we need is an off road trail app. Again there are several options, but after trying all of them we decided to stick with EveryTrail. Not only are they our partner for the Off Road Trail Maps project, but they really have the best offline topo maps that also allow you to import any trail data you want. The Every Trail Pro app is not iPad native, but the view is very acceptable at the 2x resolution.
Once all the pieces were assembled it was time for the install. While we’ve attempted to cover this project entirely, this article should be thought of as a guide versus wire-by-wire instructions. There may be better/faster/easier ways to do things but we want to lay out the process we did in general terms, so you can figure out a similar install if you’re so inclined.
After removing all the Kenwood 7120 components we were left with nothing more than the stock wiring harness and OEM radio mounts.
And a big hole in the dash…
The first order of business was wiring the aftermarket radio adapter to all the components we needed for the iPad install. We used an amplifier installation kit to run a main power lead directly from the battery, and then used the included remote turn-on cable to activate the amp only when the ignition key is on. Wiring the speakers from the harness to the amp is pretty straightforward since the harness supports standard color codes. We chose to use a 12V socket hidden in the dash for the Griffin iPad charger, so that had to be spliced into the aftermarket harness as well.
The more interesting wiring challenge was getting audio out of the iPad and into the amp. One of the things we had to give up with this install is the steering wheel controls. In order to have volume out of the iPad audio breakout cable we used a pre-amplifier from JL audio that includes a volume knob. While it is theoretically possible to wire the JL audio device into the steering wheel controls, we’ll save that for another time. So the stereo jack out of the breakout cable converts into RCA jacks for the JL audio pre-amp with a $5 adapter. From there, the JL audio right/left output had to be split for each of the 4 channels in the amp: front right/left and rear right/left. The result is a lot of cabling and splitters, but everything worked out as we expected. You can see the diagram below for details on how everything is wired.
It was quite an amazing feeling the first time everything powered on and the sweet sounds of Aerosmith came blasting out of the iPad. While the small Sony amp won’t win any awards for power, the 50watts/channel are more than enough to drive the aftermarket speakers up front, and we had to dial down the rear output to about 50% to avoid damaging the stock speakers.
Wiring status: complete!
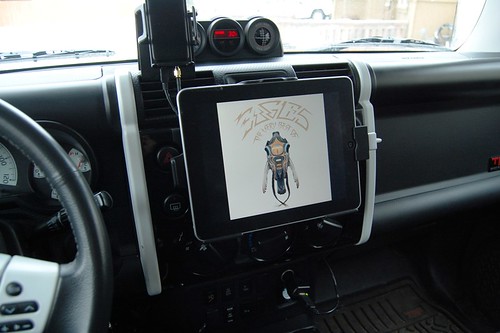
Of course wiring the system is only half of the job. An iPad wired into the FJ doesn’t do any good if it’s sitting on the passenger seat. This is where the real ingenuity in the form of a custom mount comes into play. There are probably a dozen different ways to fabricate an iPad dash mount, but we had to use mostly regular hand tools and wanted to come up with a mount that’s easily repeatable. We also wanted to try a couple of options for the actual iPad mount itself so our solution had to support either the RAM or the ProClip platform.
The basic idea was to ‘fill in’ the hole in the dash with a steel plate that we could secure the iPad mount to. In order to do this, we used two 4” (approximately) pieces of 1” right-angle aluminum that were bolted to the OEM radio mount. This gave us a flat surface to mount an 8” X 3.5” (approx) 16ga steel plate to. That steel plate was then drilled to accommodate either of our mounting options. Of course there were several sets of screws/bolts/washers/nuts needed to secure everything together as well. One interesting item we didn’t anticipate needing was a 3” X 2” X 4” block of wood. The mount ProClip sent us to test included their offset block, but it didn’t provide enough depth from the steel plate to the front of the dash, so we used the wood block to push the mount out farther. See our iPad Mount Hardware List for details on all the pieces we used.
We ended up testing both the ProClip iPad mount with pass-through connector as well as the RAM iPad mount. The first thing you’ll notice about nearly all iPad mounts is that they cannot be used with a case. RAM does offer a generic mount that will work with a case, but for our integration we wanted to review the specific iPad mount. We love our OtterBox cases for the iPad, so the fact that we can’t use a case with our mounts is disappointing. Still, we realize that it would be impossible for mount manufacturers to create a mount that works with all (or more than 1-2) specific cases, so this limitation is understandable.
RAM iPad Mount
RAM offers this mount in a locking and non-locking version. The idea of a locking mount is very cool, but we asked to review the non-locking version since it’s a little smaller. If you haven’t seen the RAM mounting system before, they basically use a ball/arm setup that you attach the mount to. We mounted a 1” ball on the steel plate, and then used a short (2”) arm to attach to the ball attached to the RAM mount. The great thing is that this system is very versatile and you can do just about anything you need. This versatility comes at a cost though, the RAM setup protrudes from the dash quite a bit and can interfere with your heater controls. Luckily the entire mount can move up, but then it covers your clock & heater vents. NOTE: The iPad is bigger than the stock radio opening, so it will always be covering something up. Overall though, the RAM mount is a great option if you’re looking for maximum versatility. It’s simple to loosen the arm clamp and rotate the entire mount in any way you like. That’s very good because the Every Trail Pro application only works in portrait mode while we usually keep the iPad in landscape mode. For an install that needs to move the mount often, this is the way to go. If you’re looking for a more ‘integrated’ mount, you may want to check out the
ProClip.
ProClip iPad Mount with Tilt Swivel & Pass-through Connector
The mount ProClip sent us to review includes a pass-through connector so you don’t have to plug the iPad cable in each time. Instead you can just insert the iPad into the mount and it will dock to the system. This is a great feature and although ProClip offers the same mount without the pass through, this really is the one to choose. As we mentioned above, this mount is slimmer than the arm/ball combination of the RAM so it will take additional modification to install it to the steel plate. We used a 2X4 cut to about 3”X2” as an offset block. We simply ran long (about 3”) sheet metal screws/nuts to secure the mount to the steel plate and wood block. The result is a very ‘svelt’ mount install that fits tight up against the dash. We actually had to place the mount about 1” higher on the steel plate than the RAM mount so it wouldn’t interfere with our heating controls, of course the clock and vents are now partially blocked. There’s just no way to NOT block something with the iPad installed. While this mount is not as movable as the RAM, it is on a swivel base so it’s possible to transition from landscape to portrait and back with ease. Overall it presents a very integrated look even though it’s not as movable as the RAM option. For a close in mount, the ProClip is a good choice.
We’ve had this setup installed for about two weeks and overall we’re very happy. On the trail it’s a dream come true. The ability to use big, detailed topo maps with any trail data we want is a huge plus. The iPod/Pandora controls are awesome for tunes, and the turn-by-turn navigation options are great. There are some obvious limitations that we should mention as well though. For day to day use I’ve found that I use my iPhone instead of the iPad for my 10 minute drive to work, so the iPad mount sometimes sits empty. There is no AM/FM radio, CD player, or DVD player (which I never used anyway), but for some people that may be a deal breaker. Overall though, if you’re serious about a custom audio/navigation install, this is a great way to go.
iPad Mount Hardware List
- ProClip Mounts
- RAM Mount & accessories
- 8″x3.5″ 16ga steel sheet
- 4 sheet metal screws/nuts 10mm
- Asst bolts/nuts to attach the mount of your choice
- 1″ right-angle aluminum pieces, about 4″ long
- 2×4 block to offset the ProClip mount
- Long 3″ sheet metal bolts/nuts to go through 2×4 block
Other parts/tools needed:
- Drill & assorted bits
- Screwdrivers of all sizes
- Soldering iron / solder
- Amp wiring kit
- 12v receptacle for USB charger
Get the January Issue of FJC Magazine

NOTE: Internet Explorer users should right click and select “Save Target As”


More Photos!
[flickr set=72157625770422687]