
Having only forward facing light beam patterns is not the safest for turning tight mountain corners. You should have a multitude of light patterns to spread the light, sweeping from from the driver’s side, to the front, then to the passenger’s side. Imagine sweeping your head left, center and right of the rig and seeing everything beyond the trail.
While attending Overland Expo 2014 I watched a presentation by Baja Designs on how to effectively use light beam patterns to fill the darkness off roading. For instance, Baja Designs used a single 30” Onx light bar to demonstrate a combo/driving light beam to shoot straight down the front of the rig, then use a pair of XL Pro wide corning beams to fill the left and right sides and a pair of roof mounted S2 flood lights to fill the immediate sides of a rig while traversing trails at night. You don’t want drive with only tunnel vision with only front pointing lights, but you also want to light up your peripheries. So when the wife asks you, “Why do you need all those lights?” Tell her it’s for safety so you can see everything around you at night.
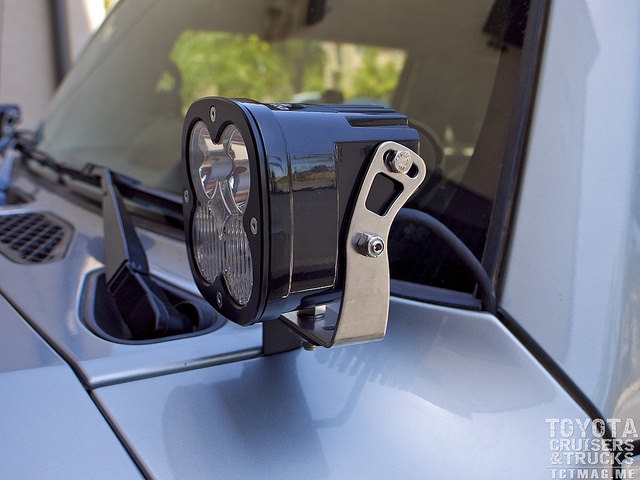
This brings us to my decision to mount a pair of Baja Designs XL Pro with wide cornering lenses on the cowl panels of the FJ using BD Customz cowl brackets. Each Baja Designs XL Pro is rated at 4900 lumens, 40 watts, draws 3.33 amps, machined from a chunk of billet aluminum and come in a black powder coated finish. There are also white versions for marine applications. These are seriously bright and well made lights. The LEDs are sourced from overseas and the lights are assembled at its San Marcos, CA headquarters. The box included extra lenses (spot and wide cornering), stainless steel hardware, Weatherpack connector and instructions. My all Baja Designs current light setup consists of a roof rack mounted 40” Stealth light bar with combo/driving lens, a pair of side rack mounted S2s with flood lenses, a pair of rear rack mounted S2s with flood lenses, and a pair of front bumper mounted XL Pros with high speed spot lenses.
BD Customz has been making various custom fabricated add-ons for the FJ for a few years now including front CNC machined grill inserts with light bar mounts, A-pillar light bar brackets and cowl mount brackets (with or without the FJ cut-out or FJ cut-out with LED backlighting). I ordered a pair with the FJ cut-out, no LEDs. The box included a pair of mounting brackets, decorative brackets with FJ cut-out, panel clips and mounting bolts. I began the installation by first laying down a couple of strips of painters tape to the edge of the fender panel where it meets the cowl panel edge. As close to the edge as possible. I used a plastic panel tool to “pop” the first set of clips on the outside edges of the cowl panel. After I got the outside edge of the cowl panel propped up with one hand I reached in with a long narrow screw driver to break the small tabs on the two clips holding the inner edge of the cowl panel (near the windshield wiper). Once you break the small tabs on the triangular clips you’ll be able to pull it straight up and off. If you bent any metal tabs holding the clips use a pair of pliers and straighten them out now. I had one that was bent and didn’t notice it until I re-installed the cowl and it would’t go back on. I had to sacrifice one of the new clips while removing the panel to investigate the problem and had to get more.
The next step is the unbolt both bolts holding the hood hinge mechanism. Install the light brackets one side at a time to lessen the hassle of realigning the hood gaps. It might be easier to have a friend hold the hood so it doesn’t move too much when unbolting the hinge, then bolting on the cowl mount. The new bolts unlike the factory hood bolts don’t have a tapered neck so you need to manually re-align the hood. Take your time and you may need to “fiddle” with it to get all the hood gaps just right.
Now it’s time to bolt up the Baja Designs lights. I chose to route the single wire where the cowl panel meets the A-pillar panel and the rear hood panel. There’s enough gap to route it and it makes for a clean and neat install without drilling. The Baja Designs lights come with a Moisture Block feature which prevents any water running down the wire and getting into the light. It’s a much thicker diameter plastic that wraps around the single light wire. A nice detail that no other light maker has.
I installed new factory panel clips (provided) onto the cowl panel. I tucked the Moisture Block portion of the wire into the cowl cavity and held the wire in the gap as I put the cowl panel back on. Gently push on top of the panel at each clip and you’ll hear it snap into place. Check your gaps and the wire. Repeat this process for the other side. The only thing left to do for me was connect each set of light wires to my sPOD. At the time of install I had not installed my new Switch Pros switching system. You can find that article in another part of this magazine. I’ll be switching all of my lights to the Switch Pros system and phasing out my sPOD. Time for a night ride to test your new cowl mounted lights.
Related Articles
This new light setup proved themselves when I was driving on our way to the Grand Canyon campground. We were on our way to FJ Summit 9 and spent a few days in Arizona. It was midnight, I was tired from 7 hours of driving and noticed all the animal crossing signs on the way. Deer, elk, and big horn sheep. Now that’s all I needed was for one of these to be wandering on the road or leaping out in front of me. It was pitch black. I flipped on the new cowl mounted Baja Designs XL Pros and boom! I saw huge deer and elk stags beyond the normal beam of my headlights. The wide cornering lenses were perfect on the hood. It lit up everything on the sides of the road and beyond. One of the best mods I’ve done yet. I don’t know what took me so long to do it.
[flickr set=72157660856585707]
![]()
To get your copy of theFall 2015 issue:   FIND US ON: |
|

Ad here.