 Warrior Products (
Removal of the original bumper is the first obvious step in the process. It’s done quickly and easily using the Warrior instructions, but we also found the Toyota bumper removal instructions (found here) helpful since they include diagrams. It’s important to keep in mind that some of the hardware from the original bumper must be retained for use on the new bumper, especially the large nuts holding the OEM reinforcement bracket on. Don’t throw anything away until you’re done with the install.
The biggest change in the 2010+ FJs as far as front bumpers go is, of course, the washer fluid bottle. In order to setup the truck for right hand drive more easily, Toyota moved the washer fluid bottle down below the engine compartment, which exposes it with virtually any aftermarket bumper. While Expedition One sells a kit to replace this bottle, Tim wasn’t sure he wanted to take that route just yet. Shooting the bottle with black spray paint effectively hides it, but it’s still exposed and could get hung up on an obstacle on some trails. Check FJCruiserforums.com for options other than the Expedition One bottle if you’ll be installing an aftermarket bumper. The bottle must be removed to install the winch plate, so we recommend doing that early in the process.
Once the OEM bumper is removed, the difficult work was preparing the FJ before mounting the new bumper. First, you we reshaped the AC condenser tubing to keep it out of the way of the new bumper & winch. Warrior includes steps to accomplish this in their instructions, and Dennis took it a step further with a bit of rubber tubing to protect the condenser from rubbing. This is essential to help prevent costly damage to the tubing.
Since we were installing a winch with the bumper, we followed Warrior’s recommendation to get it setup before initial install. Removing the entire bumper to install the winch is not a very good option, so keep that in mind before you start the project.
After the tubing was reshaped, we modified three brackets so that the headlight assemblies have more support with the new bumper. Dennis trimmed the two headlight brackets with a cutoff wheel, then sanded them smooth. We also ended up trimming the center support bracket so it would not interfere with the winch. These modifications are not in the original instructions, and should be done by a trained installer for safety reasons. The result is a much more sturdy assembly than with most other bumper installs.
If you haven’t removed the washer bottle, now is a good time to do it:
We removed 1 bolt on the front of the bottle & 2 on the rear. The second rear bolt is high under the truck, so it may be difficult to reach. Make sure the wires are disconnected and hold the bottle as you take the last bolt out, as it will hit the ground if you don’t.
At this point we installed the winch into the bumper so we could get everything on the FJ. Tim went with a Warn VR10000 winch which fits the bumper fine, but is not exactly easy to install. Dennis showed us a trick where he used silicon to hold the nuts in the winch during the install, since they have a tendency to move around. Still, the front two bolts had to be inserted on an angle to clear the lower metal on the bumper. This was a trial and error step and took us a good 15 minutes to get all the bolts started. Also, since this bumper is so tight against the FJ, the solenoid box will not work in the standard location. Tim ended up moving the box into the engine compartment, which required modifying all the wiring. It’s generally a good idea to protect the solenoid box anyway, and of course some winches may not require this modification.
FJ prepared: Check
Bumper & winch ready: Check
It was finally time to install the Warrior Products bumper (this is the easy part):
At this point the Warrior Instructions were simple and easy to follow. We installed the bumper onto the frame studs and hand-tightened the nuts. We added the winch plate frame brackets, attached them to the bumper, and lined everything up for a great fit. The 8 mounting nuts were tightened to 49 ft/lbs. and we drilled out the holes and mounted the winch plate frame brackets, then made sure everything was nice & tight.
Tim doesn’t have aftermarket skid plates for his FJ yet, but it’s clear that this bumper (like many others) leaves a gap between most skids and the bottom of the bumper. There are holes at the bottom of the metal to mount a skid plate, so the BudBuilt 2010+ filler plate may work perfectly. Bud can also do a custom filler plate if you just send him the measurements. Otherwise any local fabrication shop can produce a plate that will protect the area.
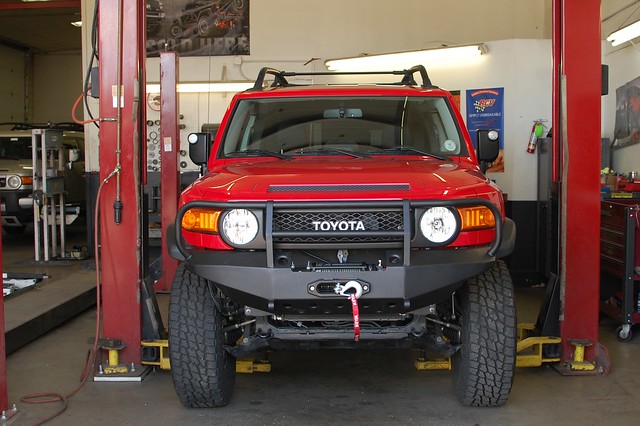
The Warrior Products FJC Front Winch Bumper looks great and provides an excellent platform for a winch. This model includes the brush guard which is an excellent option for mounting more lights and protecting the front of your truck. It fits tight to the FJ and dramatically enhances your approach angle.
The install went very well with the professional help of Dennis from High Country Performance 4x4. You should expect your local shop to charge 3-5 hours of shop time to install the bumper, plus a few minor parts to enhance the installation. With Tim’s help we’ll be putting this bumper through its paces in the next few months, so look for an update this fall.
More Photos!
[flickr set=72157629532533920]
To get your copy of the April 2012 issue of FJC Magazine:

NOTE: Internet Explorer users should right click and select "Save Target As"