
IBS DBS Dual Battery System Install

There are many dual battery systems available on the market. Some of the more famous ones kits being National Luna, Dirty Parts and Painless Wiring. You can easily build your own system as well using solenoids and isolators. The IBS DBS system is a relatively new system available in the states for the past several years. It was created by Swiss, Beat Wyss after having suffered two dead batteries while traveling in Australia’s Great Victorian Desert with his 60 Series Land Cruiser. IBS has created and made Intelligent Battery Systems for over 15 years in Switzerland. We chose the IBS DBS system due to its proven solid state design and if the starter battery dies or discharges to 10v or below we can self jump from the auxiliary battery with the optional RBM module. Our kit came from ExtemeOutback.com, the US distributor for IBS Switzerland.
I replaced the factory battery about two years ago with a Die Hard Platinum 31m marine battery. All my accessories are connected to the Die Hard. I will be installing a new Odyssey 34-PCT1500T as my new secondary battery. I didn’t want to move all the accessory wiring to the secondary battery location so I decided to reroute the factory power and negative wires to the new battery and make it my starter battery and the Die Hard my auxiliary battery. I also rerouted my winch wires to the new battery location on the passenger side since the IBS DBS system wants the winch to be running off the starter battery + alternator.
The FJ has a secondary reinforced battery shelf on the passenger side front corner. This is where right hand drive FJs mount their factory batteries and it’s also where we’ll be mounting an Odyssey 34-PCT1500T battery. I needed to source a battery tray that would relocate my power steering fluid reservoir and AC line. I also needed to replace my Expedition One windshield washer bottle with one that would fit on the passenger side fender near the firewall. About a year ago Shrockworks developed a built-like-a-tank windshield washer bottle for 2010+ FJs and soon followed up with a secondary battery tray that relocated the power steering and AC line. The washer bottled is a tig welded aluminum box and the battery tray is made of heavy gauge stainless steel. These would become the perfect compliments to a neat and clean dual battery install.
The Shrockworks battery tray was a simple install. I’m not going to go into details, but clear instructions with photos are provided. You have to first remove the factory power steering reservoir mounting bracket, unclip the reservoir and unscrew the AC line. Now that those are free and loose, you mount the battery tray using the four bolts provided. Install the power steering reservoir into the new mount on the battery tray and install the AC line into the rubber clamp provided. Now the tray is ready for the new Odyssey battery and the factory items have been relocated. Like the battery tray, the Shrockworks windshield washer bottle is a straight forward install. It provides about a gallon of fluid and comes with a new wiring harness to extend the washer bottle to the rear of the engine bay.
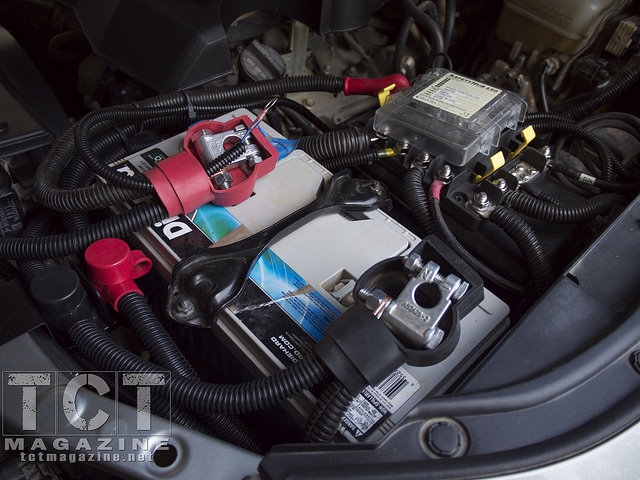
Now we’re ready to install the IBS (Intelligent Battery System) dual battery system with the optional RBM Relay Booster Module. The IBS system is a complete kit which includes the IBS-DBS monitor, 500-amp-capable/12-volt relay, 4 gauge cables, terminal lugs, 4-wire harness, and terminals for connecting the small gauge control wires to the batteries. We opted to upgrade the 4 gauge cables to heavier 2 gauge welding cable, because it’s recommended for better performance. The IBS control wires will be routed through the large factory grommet on the passenger side of the firewall, inside the engine bay.
You’ll see a small rubber nub on the top left of the grommet. Cut off the nub and fish your IBS control wires through it from inside the FJ. You could do this with fish tape or a metal coat hanger. Here’s how we did it. We used a long piece of left over 10 gauge wire and fished it through the hole in the grommet from the engine bay and into the floor board of the FJ. Don’t pull it all the way through. Back in the FJ, we wrapped the four wire ends to the 10 gauge wire with electrical tape and pulled the wire bundle through from the engine bay. We didn’t run our wires through the main factory grommet on the driver’s side because our RAM mount for the IBS battery monitor is near the passenger side of the dash. More on mounting the battery monitor when we finish the wiring.Note that throughout the wiring portion of this install I’ve used marine grade heat shrink tubing with adhesive on all crimped terminal and lug connections. All the wires are covered with split loom tubing with zip ties on each end to hold the tubing in place on the wire.
To make for a clean install we made a custom L-shaped bracket out of sheet metal, painted it black then screwed the IBS relay and the RBM booster module to it. We drilled a hole in the bottom of the bracket, slid the j hook through the hole and the battery hold down, and tightened the nut to secure the bracket, hold down and the battery together. Since the IBS relay and the RBM booster are now next to each other and close to the battery we can make easy wire connections.
Since we are installing the optional RBM booster module we will be following the wiring diagram provided in the instructions. Note that the RBM booster module instructions/wiring diagram supersede the IBS DBS instructions/wiring diagram.There are four wires that you need to connect coming from the wires we fished through the firewall. The black ground wire is connected to the negative post on the starter battery and the red power wire is connected to the positive post on the starter battery. The green wire is connected to the IBS relay at terminal 86 and the blue wire is connected to the positive post on the auxiliary battery.
The RBM booster module has four wires that will need to be connected to the IBS relay. The red wire is connected to terminal 87 on the IBS relay. The yellow wire connects to terminal 85 on the IBS relay. The blue wire connects to terminal 30 on the IBS relay. The green wire connects to terminal 86 on the IBS relay. You can connect the remaining black ground wire to the sheet metal with a self tapping screw or connect it to the negative post on the starter battery.The final wire connections will be to take the 2 gauge welding cable and connect the positive post on the starter battery to the positive post of the auxiliary battery. Do the same by connecting a length of 2 gauge welding cable to the negative posts on each battery. Now all your wiring connections are complete.
It’s time to connect the IBS battery monitor in the FJ to the wire bundle fished through the firewall via the Deutsche connector. We repurposed an extra RAM X-Grip to mount the IBS battery monitor inside the FJ. Our FJ has a seat bolt mounted RAM telescoping pole from which several accessories are mounted including the iPad, HAM radio control head and now the IBS battery monitor.The IBS system works as advertised. When you start the engine, the batteries are linked and the monitor will display the voltage for each battery and the charging volt (13.0, 13.5, 14.0 or 14.5). When the engine is off the batteries are unlinked and isolated. You can use the battery monitor to check the voltage for each battery at anytime by pressing the display button. When you need to link both batteries and use your winch, turn your engine on and manually link the batteries for 30 or 120 minute intervals by pressing the link button once for 30 minutes or twice for 120 minutes. This allows the batteries to share the load and reduce the stress on your alternator. In addition to LED indicators on the battery monitor there are also audible alarms to indicate low battery voltage and link failure. If you want to use a solar panel to charge your batteries connect it to the auxiliary battery and the IBS will automatically link and charge both batteries.We field tested all the above mentioned features including charging the system with our 100 watt solar panel while attending Overland Expo 2015. The IBS system worked as advertised. Since its a solid state, smart system we have no qualms about its quality and can recommend it without hesitation.
Sources: ExtremeOutback.com | ShrockWorks.com
[flickr set=72157656365032760]
To get your copy of the
July 2015 issue:
![]()


FIND US ON:
